Do you want to disable the Windows Defender (in-built application of Windows) on your System? If yes, you can do the same following three different ways described in this article. Windows Security plays a vital role in protecting your PC from a suspicious attack similar to Kaspersky and Norton.
So, some advanced features in these programs are lacking, such as web-monitoring, blocking new software installation, etc. Now, Windows Defender even occupies more space as compared to the apps, as mentioned earlier. These are the reasons why several users disable the Defender on their System. These three different methods are using local Settings, Registry Editor, & Local Group Policy Editor.
- Via System Settings
- Using Registry Tweak
- Using Local Group Policy
- How to Enable Windows Defender in Windows PC
How to Disable/Enable Windows Defender in Windows 10
Here, we explain stepwise methods to Disable Windows Defender Temporary/Permanently-
1. Now, Disable/Enable Windows Defender Via System Settings
You can disable Windows Defender using the local Settings application. Well, This is an easy process without any complexity. So, To do this, you need to follow these steps-
Step 1: Go to Cortana and type Windows Defender Security Center; once found, click on.
Step 2: Again, on the next window, select the Virus and Threat Protection category.
Step 3: Hence, select Manage settings under Virus and Threat Protection settings section.
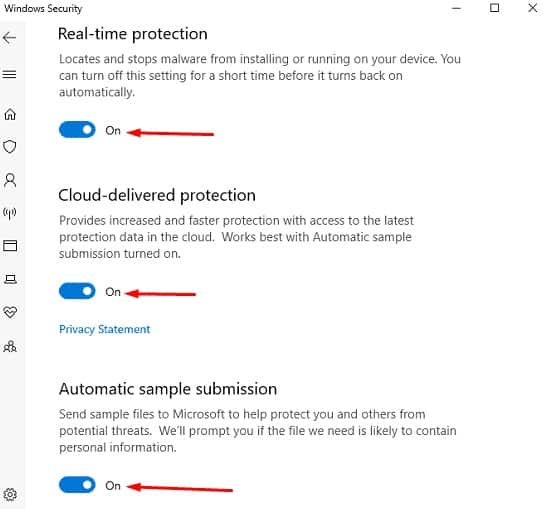
Step 4: Presently, disable the following toggle switches (see snapshot as well).
- Real-time Protection
- Cloud-Delivered protection
- Automatic Sample Submission
Step 5: Succeeding after, you will receive a new pop-up asking to permit the access. Click Yes.
It will temporarily disable Windows Security on your Windows 10 PC. However, this is the easiest way; it also has its drawbacks. This Windows Defender gets enabled by default when you next login. So, This implies that when you Restart your System, the Settings switch back to its normal condition.
2. Disable/Enable Windows Defender using Local Group Policy
Besides, you can perform the same task using Group Policy. Well, All you have to is to follow these steps-
- Make a right-click on the Windows icon & select the Run option from the Power menu.
- Type gpedit.msc in the void box & tap the OK button to open the Group Policy Editor window.
- Here, navigate to the following path-
Here, Computer Configuration > Administrative Templates > Windows Components > Windows Defender Antivirus
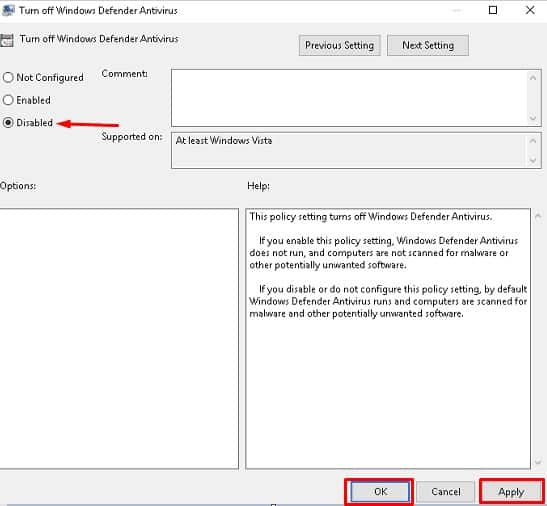
- So, There forth, double-click on Turn off Windows Defender Antivirus services (see snapshot below).

- Now, mark a Disable checkbox to enable Windows Defender.
- After that, Click the Apply & OK button to confirm the changes.
Suppose you want to enable Windows Defender, follow the above procedure, and check the Enable Radio button.
Note This: The Group Policy Editor only works in Windows 10 Pro and Enterprise versions; therefore, Windows 10 Home users cannot avail of it.
3. Disable/Enable Windows Defender Using Registry Tweak
Because Windows Defender is Microsoft’s in-built app, it doesn’t provide the features to Uninstall it. Though, you can disable this tool either temporarily or permanently using registry tweaks. So, Here is how to proceed-
- First, Press Win and R altogether to launch Run dialog.
- Now, In the void box, type Regedit and hit the OK button; it will launch the Registry Editor window.
- In case if the UAC prompt appears up, tap Yes to permit the access.
- Here, copy & paste the following path in the address bar then hit Enter to access the path-
HKEY_LOCAL_MACHINE\SOFTWARE\Policies\Microsoft\Windows Defender.
- Hence, switch to the right pane & do the right click on the blank area.
- Click the new option and select DWORD(32-bit) using the context menu.

- Now, put the critical name DisableAntiSpyware then hit Enter.
- So, After that, open the recently created file and change its value to 1 from 0.
- Lastly, click OK to save the changes & Restart your System.
This will disable the Windows Defender on your desktop or Task Manager.
Note this: Bear in mind, wrongdoings in the Registry might be risky for your System. This may corrupt your entire OS or personal files. That is why it is recommended to create a System Restore point to protect unwanted data loss.
How to Enable Windows Defender in Windows PC
If you need to enable this app again, you have to go through the below procedure-
- Open Registry Editor and navigate to the following address.
HKEY_LOCAL_MACHINE\SOFTWARE\Policies\Microsoft\Windows Defender
- So, Move to its corresponding right pane and right-click on recently created DWORD entry.
- Now, select Delete from the context menu.
- Here, Once finished, close the Registry Editor and Reboot your System.
This Defender icon and its settings will re-appear the next time you log in to your System.
Final Words :
The Defender is the best tool to protect your system from any malware attack. But, sometimes, it may prevent new applications from installing. If that’s the case, you can temporarily disable this app. If you want to install some other anti-malware program, you should permanently disable it using either the 2nd or 3rd method. While you try to invoke some other security program on the System, the Defender will automatically disable Real-Time protection.