Wyze Camera devices are great, but some of the instructions for setting them up aren’t clear. I don’t know whether or not I can connect my Wyze Camera to my new Wi-Fi network. There isn’t a lot of information about this problem. Change your ISP when you move or change your Wi-Fi connection. Wyze should have thought about that at some point. Even so, this process isn’t as hard as it sounds. No matter how you look at it, it’s hard to figure out and takes more time than it should. You can read on to learn how to connect your Wyze Camera to a new Wi-Fi connection, even though there might be some problems.
Switching Wi-Fi Connections On Your Wyze Camera
The ideal way to connect a Wyze camera to a new Wi-Fi network or connection is to treat it as if you were setting up a new Wyze Camera in the same way. You shouldn’t change any of the settings from your old Wyze Cam or delete any of the old settings. When setting up a new Wi-Fi connection, treat it like a new one even though you’ll use the same device. This means that you need to go through the normal setup process for your Wyze Cam to get it up and to run. The good news is that if you set up your camera connection a long time ago or forgot the steps, you can do it again.
It is important to remember that a Wyze Camera needs power, an app from the App Store or Google Play Store, and a connection to the internet to work. Also, it’s likely you already have the app for the Wyze Camera, so you know how to use it. It’s essential to make sure your app is up to date and that your phone’s firmware is also up to date. Finally, let’s set up your Wyze cam’s Wi-Fi. Do this.
Steps To Connect Wyze Cameras To New Wi-Fi
1 – Open the Wyze app on your Android or iPhone.
2 – If the app doesn’t remember you, log in.
3 – Now, connect your Wyze camera to the USB port or a power outlet. Wait until it turns yellow (about thirty seconds).
4 – Next, hold the Setup button on the back of the camera until you hear the automated message that says, “ready to connect.”
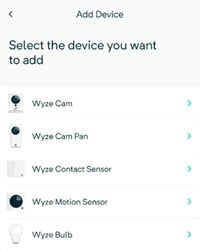
5 – Now, go back to the phone app and click the three dots in the top right corner of your screen. Then, tap on Add a Product and choose the correct name for your device to add it (Wyze Cam, Sensor, Pan, Bulb).
6 – The setup window will show up. Now, follow the instructions and give it time if it takes a while.
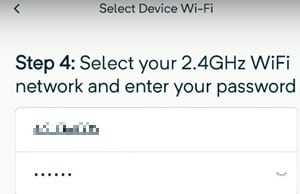
7 – You’ll be asked to choose a 2.4GHz Wi-Fi network and enter your password when you start. Keep in mind that Wyze Cams don’t work on networks that use 5GHz. So next, connect to your new Wi-Fi with the same password.
8 – Lastly, scan the QR code on the app with your Wyze Cam. During the scan, you’ll hear a voice say, “QR code scanner.” Also, I heard the voice command button can be tapped to get to it quickly.
Now, you can choose a new label for your Wyze Cam by going to the device settings (gear icon) after you have chosen it from the device list. When you touch the name, you can change it. If you need to connect more than one Wyze Camera to a new Wi-Fi network, follow these steps for each one until all of them work. You can make even more changes on your own, like choosing whether to detect motion or sound.
Updating Firmware On A Wyze Camera
How to update your firmware will depend on whether or not you could connect your device to a network when you tried to do it. We’re going to cover both of them.
Updating Firmware On A Wyze Camera Using The App
Well, if you were able to connect to your Wi-Fi network, then follow these steps.
1 – Open the Wyze app on your phone. Then, tap on Wyze Camera.
2 – Next, click on the Settings icon in the top right corner of the screen.
3 – Then, tap on Device Info.
4 – Click on Firmware Version and look for the upgrade option.
5 – If you don’t see the option to upgrade, you’re up to date. You’re ready to go. If you do, then install it.
Updating Firmware On A Wyze Camera Manually
The sad news is that if you don’t have internet access to your Wyze camera, you’ll have to do it on your own to update the firmware. Let’s start now.
1 – Navigate to the Wyze Release Notes & Firmware page, find the firmware for your camera, and download it.
2 – The microSD card for your camera should be in your computer already, but if not, insert it now.
3 – Extract the files now to the root directory, the first folder, on the SD card.
4 – When the camera is off, put the microSD card back in the camera
5 – Next, hold the setup button on your camera, plug in the USB cable, and hold setup button until the light turns purple (Wyze Cam v3) or blue (Wyze Cam v2 & Wyze Cam Pan).
6 – After that, wait up to 4 minutes for the device to restart.
7 – Now, your camera should have updated firmware.
FAQs:
How To Reconnect A Wyze Camera?
1 – In the Wyze app, tap the + icon and choose Add Device.
2 – Choose your camera as the device and go through the setup steps.
Well, it isn’t very pleasant when Wyze Cameras don’t have enough Wi-Fi to work, like when they need to update. However, the company should be able to solve this problem soon.
Does A Wyze Camera Work Without Wi-Fi?
For the first setup of a Wyze Camera, you need to be able to connect to the internet. After that, it will record offline, but only to a microSD card, you put in it and only if you set it up to record locally.
Final Thoughts:
It’s a shame that you have to go through the whole process again when you’re only changing your Wi-Fi network, and that’s your only choice. Maybe in the future, Wyze will develop a new way to connect to a new network. This way, you can connect to it more quickly. If you don’t want to use this tutorial until then, you can switch to new networks on as many cameras as possible.